
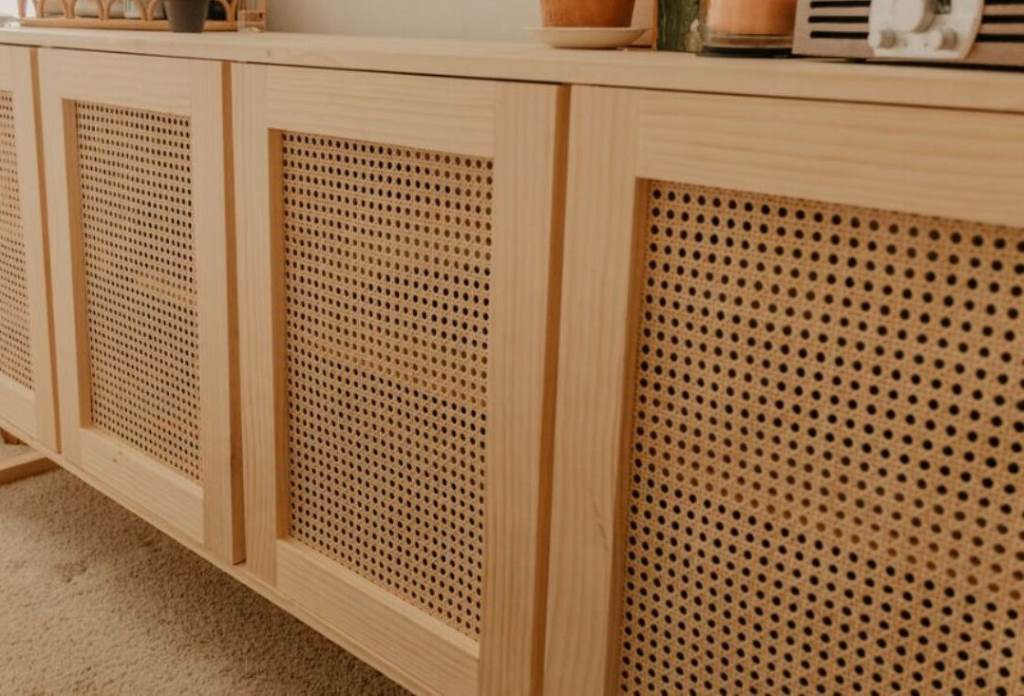
Transforming your home doesn’t always require a full renovation. A simple, stylish update like a cane webbing cabinet door makeover can breathe new life into your space. Cane webbing, a versatile and trendy material, adds texture and charm to furniture. It’s perfect for DIY enthusiasts looking to refresh cabinet doors, media consoles, or storage pieces. This article shares practical, creative ideas to help you achieve a stunning makeover. According to a 2023 survey by the National Association of Home Builders, 61% of homeowners prefer DIY projects to save costs and personalize their homes. The U.S. Census Bureau also notes that home improvement spending reached $522 billion in 2022, showing the popularity of upgrades like these. Let’s explore how to use cane webbing to create a coastal chic or modern look for your cabinets.
Why Choose Cane Webbing for Cabinet Doors?
Cane webbing is a lightweight, woven material made from rattan vine or cane strips. It’s durable, affordable, and easy to work with, making it ideal for DIY projects. Its open weave adds a breezy, natural vibe, perfect for coastal decor or beach cottage aesthetics. Cane webbing also pairs well with wood trim or glass inserts, offering endless design possibilities. Whether you’re updating IKEA furniture or a vintage TV stand, this material delivers a high-end look without breaking the bank.
Tools and Materials You’ll Need
Before starting your cane webbing cabinet door makeover, gather the right tools and materials. Having everything ready ensures a smooth process. Here’s what you’ll need:
- Cane webbing roll: Choose a size that fits your cabinet doors. Common widths include 18 or 24 inches.
- Utility knife: Cuts cane webbing cleanly.
- Staple gun: Secures webbing to the cabinet frame.
- Measuring tape: Ensures precise cuts and placement.
- Power drill driver: Removes and reattaches cabinet doors.
- Hot glue gun: Bonds webbing for a polished finish.
- Paintable caulk: Seals edges for a clean look.
- Blue paint tape: Protects surfaces during painting or cutting.
- Gorilla Max Strength Construction Adhesive: Provides extra hold for heavy panels.
- Glass cleaner: Cleans glass inserts if combining with cane.
- Optional tools: Miter saw, Kreg Jig, or oscillating tool for advanced cuts or frames.
Pro tip: Soak cane webbing in water for 10–15 minutes before cutting. This makes it more flexible and easier to work with.
Step-by-Step Cane Webbing Cabinet Door Makeover

Ready to start your project? Follow these steps to transform your cabinet doors with cane webbing.
1. Plan Your Design
Decide on the look you want. Coastal chic? Modern minimalist? Or a Pottery Barn-inspired vibe? Sketch your design or browse Ballard Design for inspiration. Consider adding gold twig pulls for a touch of elegance or wood-grain tape for a rustic feel.
2. Remove Cabinet Doors
Use a power drill driver to carefully remove the cabinet doors. Place them on a flat surface. Clean the doors with glass cleaner to remove dust or grease. This ensures a smooth surface for your makeover.
3. Measure and Cut Cane Webbing
Measure the cabinet door panel where the cane webbing will go. Add 1–2 inches to each side for overlap. Use a utility knife to cut the cane webbing to size. Ensure clean, straight cuts for a professional finish.
4. Attach the Cane Webbing
Lay the cane webbing over the cabinet door. Secure it with a staple gun, starting at the top and working your way down. Pull the webbing taut but not too tight to avoid warping. For extra security, apply Gorilla Max Strength Construction Adhesive along the edges.
5. Trim Excess Webbing
Once secured, use a utility knife to trim excess cane webbing. Be precise to avoid fraying. Apply paintable caulk along the edges for a seamless look. If you’re adding wood trim, secure it with a hot glue gun or small nails.
6. Paint or Stain (Optional)
Want a bold look? Paint the cabinet frame with Behr Ultra Scuff Defense or Sherwin Williams paint. Use blue paint tape to protect the cane webbing. For a natural vibe, apply a wood stain to enhance the rattan’s texture.
7. Reattach the Doors
Once the webbing is secure and any paint or stain is dry, reattach the cabinet doors using a power drill driver. Double-check alignment to ensure they open and close smoothly.
8. Add Finishing Touches
Install gold twig pulls or modern knobs for a chic upgrade. Clean the surface with glass cleaner for a polished look. Step back and admire your work!
Creative Cane Webbing Makeover Ideas
Cane webbing is versatile, so you can tailor it to your style. Here are some inspiring ideas:
- Coastal Chic Media Console: Pair cane webbing with white or navy paint for a beach cottage vibe. Add glass inserts for a breezy, open feel.
- Modern IKEA Hack: Transform an IKEA TV stand with cane webbing and sleek black handles. Use wood-grain tape for a custom touch.
- Rattan Cane Chest: Update a storage piece with cane webbing and rattan wrapping for a boho look. Perfect for a family room.
- Pottery Barn Dupe: Mimic high-end designs by combining cane webbing with wood trim and gold accents.
- Mixed Materials: Combine cane webbing with glass inserts or air-dry clay accents for a unique, textured look.
Tips for a Professional Finish
- Use quality materials: Shop at Home Depot or a home improvement store for durable cane webbing and tools.
- Practice caning techniques: Watch tutorials to master webbing placement and tension.
- Child safety: Secure cabinets with child-safe locks if used in a family room.
- Test tools: If using a miter saw or air compressor, practice on scrap wood first.
- Clean as you go: Use glass cleaner to keep surfaces spotless during the process.
Read Also:
6 advantages of having a velvet couch
Common Mistakes to Avoid
- Skipping soaking: Unsoaked cane webbing can crack or fray.
- Over-tightening: Too much tension distorts the weave.
- Poor measurements: Double-check dimensions to avoid waste.
- Ignoring alignment: Misaligned doors look sloppy and affect function.
- Rushing paint: Let paint or stain dry fully to avoid smudges.
Combining Cane Webbing with Other Materials
Cane webbing shines when paired with other materials. Try these combinations:
- Glass inserts: Add transparency and elegance to cabinet doors.
- Wood trim: Frames the webbing for a polished look.
- Rattan wrapping: Enhances the natural, boho vibe.
- Painted accents: Use coastal decor colors like blue or white for a fresh feel.
- Metal pulls: Gold or brass pulls elevate the design.
Maintaining Your Cane Webbing Cabinets
Cane webbing is low-maintenance but needs care to stay beautiful. Dust regularly with a soft cloth. Avoid harsh chemicals; use glass cleaner or mild soap for spills. If the webbing loosens over time, re-secure it with a staple gun or adhesive. For cane furniture repair, replace damaged sections with new cane strips.
Conclusion
A cane webbing cabinet door makeover is a budget-friendly way to refresh your home. With simple tools like a staple gun, utility knife, and power drill driver, you can create a coastal chic or modern masterpiece. Whether you’re upgrading a media console, TV stand, or storage piece, cane webbing adds texture and style. Follow the steps, avoid common mistakes, and experiment with creative ideas to make your project shine. Ready to start? Grab your tools and transform your cabinets today!
FAQs
How do I choose the right cane webbing size?
Measure your cabinet door panel and add 1–2 inches for overlap. Common widths are 18 or 24 inches. Check roll widths at home improvement stores.
Can I paint cane webbing?
Yes, but use a paint sprayer for even coverage. Apply light coats to avoid clogging the weave. Test on a small piece first.
Is cane webbing durable for daily use?
Cane webbing is strong and long-lasting with proper care. Avoid heavy impacts and clean gently to maintain its look.
How long does a cane webbing makeover take?
A single cabinet door takes 2–4 hours, depending on skill level. Painting or staining adds drying time. Plan a weekend for multiple doors.
Where can I buy cane webbing?
Find cane webbing rolls at Home Depot, online retailers, or specialty craft stores. Look for quality rattan cane for best results.
References
- National Association of Home Builders: https://www.nahb.org
- U.S. Census Bureau, Construction Spending: https://www.census.gov/construction/c30/c30index.html